| Hardware This and That |
|
|
. |
. |
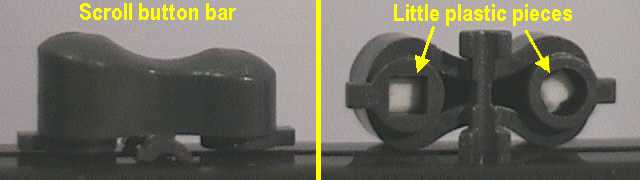
| What you do is, just cut two tiny platic squares (if you can, cut one
square and one circle <g>) and put them in the two holes of the scroll
button bar, like on the image above (the white pieces on the right image).
I thought about an 'international' resource for the plastic pieces and
I found one: An empty TicTac box - you know these little spearmint devils,
each having only 2 calories :). Anyway, take off the white cap of
the box and cut a little piece from the *longer* side of the part
that goes into the transparent half of the TicTac box. Odd, the short side
is thinner. To be precise, the plastic pieces I used, were exactly 0.81
mm thick (0.0032 inch). If you cut them the right size, they stick in the
holes (very handy for later assembly!). But make sure they are not too
big, so they can reach all the way down in their hole.
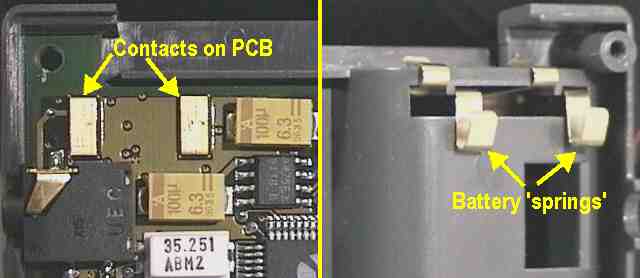
. Now assemble everything again. Put the buttons back into the case (take care - the scroll buttons have an orientation - the flatter one is the scroll-down button) and put back the rubber contacts. Now fit the main board again - exactly in the reverse order as you took it out. A good trick is, to make sure that the board stays from the beginning on underneath the plastic grips on the left side. Then fit it over the battery compartment and finally snap it onto the plastic grips on the right side (again, all seen from behind!). . When you did everything right, you'll have very 'reactive' scroll buttons from now on. Before you close the case finally, make sure the buttons are not already pressed without user action - in that case your plastic pieces were too thick. IMO, the 'short action' buttons are no problem at all. For one they are covered by the flip top when the Palm is not is use and even if pressed accidently, they don't cause any action when the device if off. However, reading ebooks in bed is the usual fun again ... . |
. |
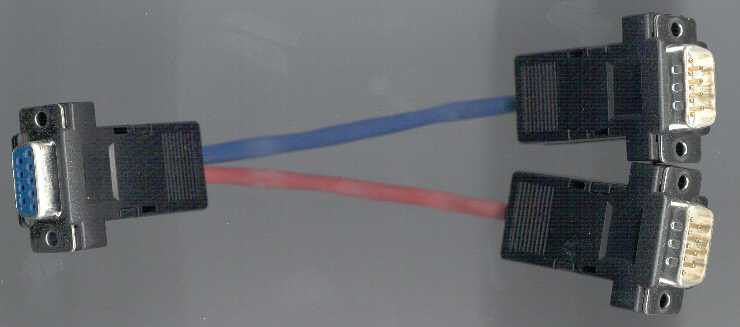
| Once you have the cable, just plug in everything. The two cradles in
the two male ends and the Y-cable into the RS-232 port, done.
. Now, you might imagine that it works as long as one cradle is empty while the other one is in use, but it's even better! You can keep *both* Palms in their cradles, as long as you don't push both hotsync buttons at the same time. The reason is, that all Palms are using an RS-232 driver that is 'deselectable'. That means, when there's no serial activity, the driver is switched off to preserve power. But at the same time, the output lines of these drivers are going into a high impedance state, in other words, they 'disappear' electronically on the bus (what the Y-cable in fact is). So, as long as the serial port is not opened by some app using it, one Palm is not bothering the other. . ATTENTION: These RS-232 driver chips are quite robust, but I wouldn't push my luck :). Starting for example hotsync operations simultaniously on both units will definitely cause a signal conflict. Under normal circumstances the driver will survive that procedure, but as I said, please don't push your luck!!! Apart from that, it's absolutely senseless, since the hotsync or any other serial communication will definitely fail. Please take also care, that there's no app or hack that keeps the serial port open. In doubt, or when testing new serial applications, you can always remove the currently unneeded unit, then it's absolutely safe. . I'm using that construction for quite a while now and it's working great. I can sync and test apps on my old PalmIII for example, while at the same time my Palm V can recharge in its cradle. Oh, in case you care, you could even build a 3-way Y-cable, to connect a PalmPilot, a Palm III and a Palm V cradle :) ... have fun! . |
|
. The DTR cradle drain hack . Eversince the DTR signal on the Palms was a kind of problem. For one, DTR is not implemented according to RS-232 standards regarding its voltage level and additionally it causes a constant power drain when the Palm sits in its cradle connected to a PC. Some hacks - if you can call it a hack - just cut that DTR line in the cradle. For hotsync its not necessary. But an external modem for example might well use that signal, depending on the configuration. So I never picked up that 'brute' solution :). Now K.C. Lee came up with a fine and still simple solution for that drain problem. Using only one general small signal transistor and a simple resistor, all together for 50 cents, the little circuit not only stops the unwanted power drain when the Palm is off, but also corrects the DTR level to 0V instead of the 3.3V when the Palm is off. But I don't have to explain that all again. K.C. Lee compiled a very nice PDF document: 
DTR Hack.pdf (19kB) . . Note for European users: If you have a hard time getting a 2N3906 transistor, just use a BC557, BC558, BC559, BC327, BC328 - they are all ok and easier to get in that part of the wold :). . |
|
. Finally a chance to repair a broken screen . You might have been lucky so far, but it can happen and usually it happens quick and unexpected :) ... A broken screen meant automatically paying $100 for Palm's repair service (BTW, not really expensive - look out for graphic LCDs with backlight and digitizer on the free market!). The b/w screen in the Palm III series is a custom type and not available on the free market. . But now there might be a good chance now for a cheaper repair. Gethightech.com offers various possibilities to get away far below $100. Most cracks after a moderate drop are only affecting the protective glass layer with the digitizer, not the actual LCD module. Gethightech.com offers that glass completely with the digitizer for $45. Unfortunately Palm IIIxe owners are left out, there screen is different and the solution doesn't work. On the pictures below you can see the glass you get from Gethightech.com and a typical broken screen, good for such a repair. . |
 .. ..
. |
| There's not much to say about the installation process. The glass layer
is glued on the LCD module with some thin adhesive around the rim and you
can seperate the two parts quite easily, just take your fingernails and
some time - adhesive loosens slowly! In fact, Gethightech.com has a nice
Step-by-Step
page how to do it. Generally I would say, you should know yourself
whether you have the skills to take your Palm apart and do the job. If
you really have 'two left thumbs', find a friend for the job :). The only
'secret' might be the connector for the 4-pin digitizer flat-cable, I get
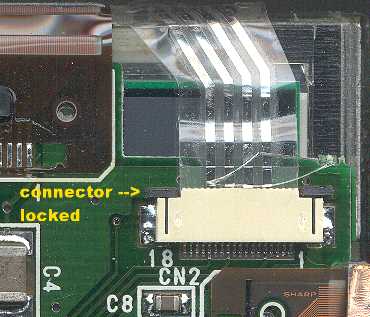
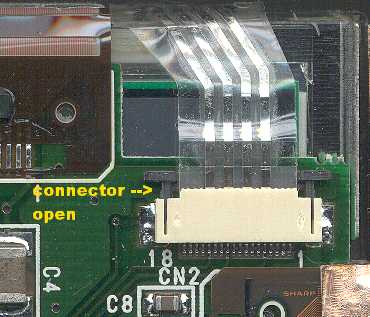
quite some support mail how to get that loose. The trick is to unlock the
connector with the two little black parts left and right of the cable.
See the images below.
. |
 .. ..
. |
| Just slide that black 'lock' out (a little screwdriver or good fingernails
are the perfect tools) and the cable is loose. Once you have the parts
seperated and ready to fit the new glass, take care to clean the LCD as
well as the new glass layer with a lint free wipe. You won't be happy with
your new screen if you have to look always at the same piece of fluff *between*
the two parts where you'll never reach again!
. But Gethightech.com also offers complete, used screens for $60 or $80, depending on the screen condition. And there are much more Palm components, also hard to get ones like empty cases, motherboards etc. etc. I like the idea of having finally a 'part shop' for the Palm, excellent idea and highly missed so far. . If you're not living in the US, Gethightech.com has alternative website and places to order: Anyone anywhere except Canada go to The European distributor If you happen to live in Canada, The
Canadian distributor is the right link.
|
|
. Last updated: July 11rd, 2000 Copyright © 1997-2000 by Peter Strobel, all rights reserved. |