========================================================================
A couple of DVD games, DVD
rips and CD games on a single DVD - Tutorial
========================================================================
Disclaimer: This
tutorial is for educational purposes only! Do not use this tutorial to compile
discs that contain backups you do not legally own. I am in no way responsible
should people use this tutorial for illegal activities. Respect the legal
rights of the copyright owners!!!
|
Done by |
: |
JRLS |
|
Date |
: |
January…July, 2004 |
|
Version |
: |
1.7 |
Note1: Tested on a PAL PS2
(V7) with a Messiah2 PRO v1.3.
Note2: Don’t mind the Dutch
Windows XP and/or bad pictures…
========================================================================
History:
I have been trying to get this to work for some time now and read a lot
of posts on forums concerning this and gone through some manuals. There are a
couple of tutorials to put full DVD games on a DVD and also putting full CD
games on a CD. I was also interested in putting DVD rips back on DVD and
putting CD games on a DVD.
Until now, I was only able to put two full DVD games on a single DVD and
get that to work.
When I tried more games on a single DVD or tried to put DVD rips on a
DVD again I stumbled into a couple of problems. Now that they are kind of solved
for me, I decided to write this manual.
The idea:
Some people cannot boot DVD rips, since their backup method won’t allow
it. Also, there are people that cannot boot CD games (anymore) because of a
laser issue, or again their backup method. Or maybe your backup CD makes awful
noises while playing?
For those cases, it would be nice to:
• Put some DVD rips
together on a single DVD.
• Put
that one CD game with the awful noises on a DVD and give your laser lens a
break.
• Put that DVD rip on a single DVD, so
you can finally play it on your PS2 (the full DVD game is nowhere to be found)
Success rate:
• Putting a couple
of DVD rips on a DVD has a pretty high success rate. All protections from the
game were already removed, and the only thing you need to add is the media
check again.
• Putting
one CD game on a DVD will work most of the time.
• Putting full DVD games together on a
DVD is not useful. Just make a 1-1 copy, and forget about this tutorial.
• Putting a couple of
CD games together on a DVD has a low success rate, since quite some CD games
contain checks other than media checks (LBA checks for example) that prevent
you to put more games on a DVD.
• Putting CD games
together with DVD rips has also a low success rate for the same reason, since
the CD games themselves can be the problem.
(This tutorial is mainly written for the first two •)
Notes:
• Use
good quality media! Among them are Verbatim and TDK. Get rid of those Princo’s!
• Quite some games have LBA checks (CD
games for example), and in order to make them work, you need to rewrite the LBA
tables. DVD rips don’t have such checks; therefore, DVD rips back on DVD have a
high success rate.
• DVD-RW is your friend! Test
your compilations first and if they are good, burn to a DVD-R. Not all PS2
versions will read DVD-RW, so if yours doesn’t, please don’t bother trying
this. Unavoidably, you will get some coasters on the way.
• It all depends on the quality of the
DVD Scanlite tool by Sonix which should patch your games correctly for DVD. So,
if it doesn’t patch correctly, do not bitch me about it! Ask Sonix!
• Games
in subfolders don’t work (yet). Maybe someone will find a workaround or fix.
• Again, this method is not 100%
successful!! You might get some
coasters. By prepared!!
========================================================================
Tutorial – Multiple games on a
DVD
========================================================================
The following stuff I used for my project:
• A couple of ISO’s or BIN/CUE files
for each game you have that you want to put on a DVD. These games can be DVD
games, DVD rips or CD games.
• ISOBuster for
extracting files from the ISO or the BIN/CUE files.
• CDLoader for creating a
menu from where to choose what game to boot.
• DVD Scanlite 3.5 by Sonix for putting
DVD checks back into DVD rips and patching CD games.
• Sony CDVDGEN 1.5 for
creating a bootable DVD.
• DVD Decrypter for
burning an image.
• Optional: CDVDGEN
ISOBuilder 1.0 by JRLS for merging the ISO parts.
CDLoader and DVD Scanlite 3.5 (or newer versions) can be downloaded from
www.ps2ownz.com. The rest you should find
for yourself on the net.
For this manual I’m going to put three games on a DVD. The following
games I used are:
• Auto_Modellista_USA_PS2-CSiSO
(DVD rip).
• Clock_Tower_3_USA_PS2-MIRACLE
(DVD rip).
• Paris.Dakar.Rally.2.DVDRIP.PAL.PS2-ConFuSiON
(DVD rip).
First download CDLoader. Make sure you download the correct version of
CDLoader that will boot on your PS2 console version. I have a PS2 version 7, so
I downloaded CDLoaderV7_b51. I’ve tried other versions of CDLoader before and
they didn’t boot, so beware.
Unpack the CDLoader package and there will be an ISO in it, probably
called “CDLOADER.ISO”.
Start ISOBuster and open the CDLoader ISO. The following files will be
in there:
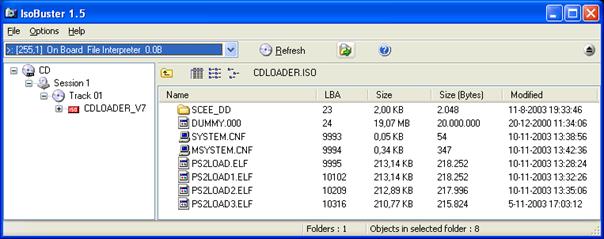
Extract the following folder (and the files within that folder) and
files to a separate folder on your hard drive. Don’t choose a fancy folder
name. CDVDGEN might be picky about spaces and long folder names. Keep it simple
like “C:\CDLOADER\”, not something like “C:\My Documents\My Disc\.
You can toss the other files not listed below. They are not really
needed.

Now I load my first game image in ISOBuster. I used “Auto_Modellista_USA_PS2-CSiSO”
which is a DVD rip. If I load up the BIN/CUE file I get the following files:
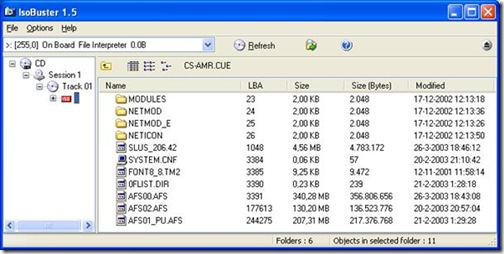
Extract all the folders and files to your hard drive. Keep it simple
like “C:\AM\”
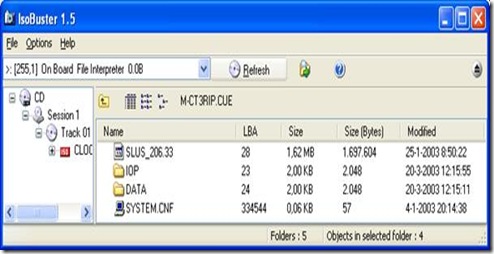
Now I load my second game ISO in ISOBuster. I used “Clock_Tower_3_USA_PS2-MIRACLE”
which is also a DVD rip. If I load up the BIN/CUE file I get the following
files:
Again, extract all the folders and files to your hard drive in a
separate folder (not the same folder in which the previous game files were saved).
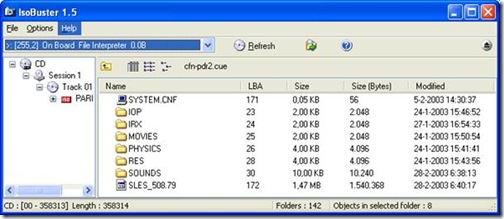
Again do the same thing for my last game “Paris.Dakar.Rally.2.DVDRIP.PAL.PS2-ConFuSiON”:
All three games have a file that will be executed when running that
game. These are the SLES and SLUS files. In this case these are the files:
• Auto Modellista: SLUS_206.42
• Clock Tower 3: SLUS_206.33
•
(Some games don’t have SLUS or SLES files, but instead .ELF files.)
Now, browse with Windows Explorer to the folder where the files for the
CDLoader ISO were saved and open up the “MSYSTEM” file using NotePad (or any other ASCII editor). Edit it, so every game
has its menu item. This will be used to create a menu based on the games that
you want to put in this DVD. If the DVD boots, a menu will appear and you can
choose a game.
Each menu item should be edited this way:
\GAME
NAME\cdrom0:\SLXX_XXX.XX;1
where:
GAME NAME : The name of
the game how you want it to appear in the CD Loader menu.
SLXX_XXX.XX : This should
be replaced with the executable that belongs to this menu item.
In our case we first have the game “Auto Modellista” that has executable
“SLUS_206.42”. I want the game to show up as “AUTO MODELISTA” (wrong spelling,
I know, but this is an example!), so the first menu item will be:
\AUTO MODELISTA \cdrom0:\ SLUS_206.42;1
Do not forget to add “;1” after each line and make sure you have
exactly 10 menu items.
I have added all the three menu items, and then your
“MSYSTEM” file should look like this:
When finished, save this file.
In the case you are using one or more DVD rips (I’ve used three DVD rips),
these DVD rips need to be patched by DVD Scanlite. Also CD games put on DVD
will need a patch. This (GREAT!) tool will add the DVD checks again that were
removed and also patch CD games. If you don’t do that, these games sure will
not boot.
So, to list it up (pay
attention!):
|
Put DVD games on DVD |
: |
I already said this isn’t useful! Just make a 1-1 copy of the DVD, and
forget about this tutorial! |
|
Put CD games on DVD |
: |
Patch with DVD Scanlite, using option “DVD-R”. |
|
Put DVD Rips on DVD |
: |
Patch with DVD Scanlite, using option “Restore”. |
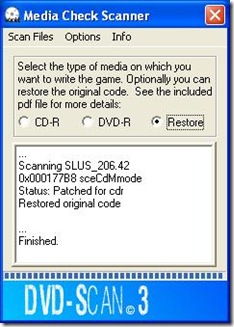
I will show you how to patch Auto Modellista. The other ones go similar.
Run DVD Scanlite 3.5 and the following window appear.
(Please also read the manual
that is provided with DVD Scanlite to know what files to scan!)
If you want to put a DVD rip back on DVD, choose “Restore” to restore
the DVD check that was removed earlier. If this game is a CD game, then choose
“DVD-R” option. Then click on “Scan Files”
and browse to the folder of your first game (“Auto
Modellista” in this case). Choose “SLUS_206.42” and wait for the program to
patch this file (this might take a while on a slow computer. Just be patient if the application seems to hang. It will finish).
If successful, it will probably patch one location in this file
(sometimes two locations):
Sometimes it is necessary to
patch more than one file. In that case the SLUS, SLES or SCES file alone is not
enough. The other files that need to be patched can be ELF files, .IRX files and
IOPRP*.IMG files. You can also just scan all files and let DVD Scanlite do the
work!
In this case, this one file is enough. Also it is known that some games
cannot be patched correctly. In most cases these are DVD rips where something
was added. For example: a PAL/NTSC selector, some trainer or an intro.
For the other two games, files “SLUS_206.33” and “SLES_508.79” are the
only files to patch and both are patched in exactly one location.
After your three games are patched, it is time to build the DVD.
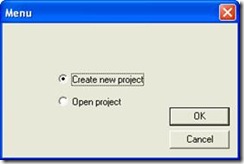
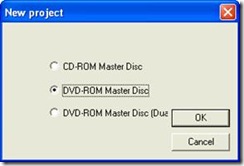
Run CDVDGEN1.5 and choose “Create new Project” and “DVD-ROM Master
Disc”:
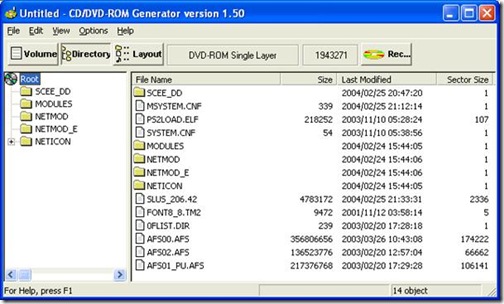
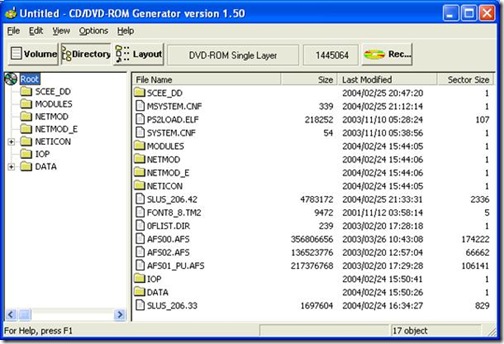
First you need to add the files of the CDLoader to your DVD master disc.
Make sure the button “DIRECTORY” in CDVDGEN is clicked and that CDVDGEN is not maximized.
With Windows Explorer (also not maximized) browse to your folder where the
files (and also the edited “MSYSTEM” file) of the CDLoader were saved and drag
and drop them into the right white pane of CDVDGEN. Drag and drop every file.
The folder “SCEE_DD” (with the files in the folder) can be dragged in one go by
dragging the folder. When this is done, it will look like this:

Next, you must add your games.
Open up ISO buster and load your first game. Pay attention to the column
with “LBA” values in it.
Some games have LBA checks in them, so they can only run properly when
the files are in the same order as the image. To avoid this, make sure you add
them into CDVDGEN in the same order, which is in ascending order of LBA values.
In this case, the folder “MODULES” should go first, then the next one. The
files within the folders should also maintain their order.
Make sure the button “DIRECTORY” in CDVDGEN is clicked and that CDVDGEN
is not maximized. With Windows Explorer (also not maximized) browse to your
folder where the files of the
first game were saved and drag and drop them into the right white pane
of CDVDGEN. Drag and drop every file, EXCEPT the “SYSTEM” file. When the first
game is done, it will look like this:
Do the same with the second game. Keep their LBA order and add them
after the first game (Again. don’t drag the “SYSTEM” file). It will then look
like this:
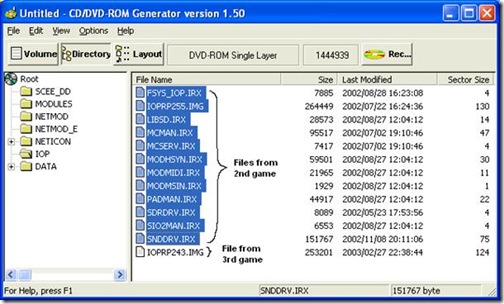
Now it’s time for the last game, but we have a problem: The third game
also has a folder called “IOP”. This should not always be a problem if the
files within “IOP” have different filenames in both games. In that case, you
can drop the files from the folder “IOP” from the third game in the same folder
and
add them at the end. Files from both games will be
in the same folder, but that should not always be a problem.
In CDVDGEN in the left pane, click on the “IOP” folder to get into the
subfolder. Then drag your files from the third game into that folder. If done,
the folder “IOP” will look like this:
Go up to the “Root” in the left pane again and then continue to drag all
the other files into CDVDGEN (Again, do not drag the “SYSTEM” files). When
done, it will look like this:

Note: There seems to be a
limit of 30 files (folders not included) that can be in your root. If you have
more than 30 files, this compilation won’t work, so avoid this.
Next, click the “VOLUME” button to fill in some info about this disc.
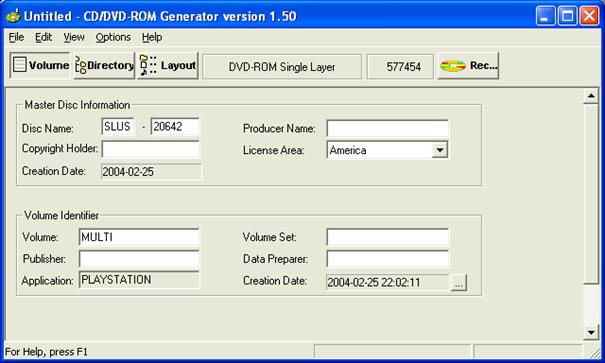
For the disc name it is said that it should match the executable that is
on the disc. If it’s not the same, the disc won’t boot (you can rename the SLUS
or SLES files in your compilation, but in that case you also have to change the
Disc Name to match this. This may cause your game not to boot, since all kinds
of checks may be in the game, so this is not recommended).
Our first executable is “SLUS_206.42”, so your disc name will be “SLUS”
for the first textbox and “20642” for the second textbox. (Just forget about
the “_” and the “.”. They can’t be entered anyway)
Fill in your Volume name which can be anything as far as I know (I used
“MULTI”’ and also choose a Licence Area. (I’ve chosen “
If done, you should really save
this CDVDGEN project in [File] [Save as]. This will save a .ccz file.
Now, your project file is done, and it is time to write an image file.
Click the record button
![]()
and a window should pop up and ask you to save your .IML file. I saved
it as “MULTI”.
This will save an .IML file and an .IMS file.
If you have a burner that is not compatible
with CDVDGEN you might get some error message after this (I have a SONY DRU500A
and I got some errors).
(Note: If your .IML file is saved,
you can just exit CDVDGEN and use a program “iml2iso.exe” to convert this .IML
(and .IMS) to an ISO file which can be burned. But beware: if your ISO is going
to be bigger than 2 GIG, the ISO that is build by iml2iso will just gets bigger
and bigger and won’t stop, since iml2iso suffers from the FAT32 2 GIG limit.
This method will only work with small .IML files, so you’d better avoid this
and just don’t do it this way)
If you get the following error after saving:
then you are missing file “WNASPI32.DLL” in your windows system folder.
It might be on your PC somewhere else. If so, just COPY it to your windows
system folder (do not CUT and PASTE).
If not, download it somewhere and put it in your windows system folder.
This is usually “C:\WINDOWS\SYSTEM” depending on your operating system. If the
file is there, then close and restart CDVDGEN and reload your .ccz project and
hit the Record button again (thank god you saved your .ccz project, right?)
After this, you shouldn’t see
the “ASPI Manager loading failed.” error again, but you might see the following
ones, which should be ignored:
After this, this menu will pop up:
Choose [File] [Export image] in this menu and choose a filename to save.
Again, I used “MULTI”:
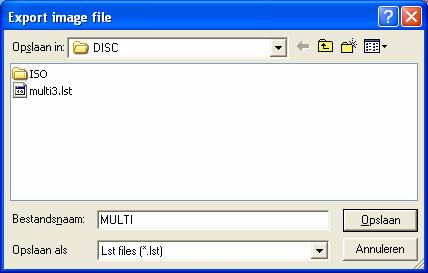
This will save an .LST file. After that, the image starts creating:
Just wait a while until it’s finished:

Click “OK” and then “QUIT”.
![]()
Since my burner is not compatible, I must make the ISO manually.
To do this, open up a DOS prompt and go to the folder where your .LST
file was saved. In this folder you will find files like “MULTI.000”,
“MULTI.001”, “MULTI.002”, “MULTI.003”, etc. if your .LST file was saved as “MULTI”.
All these files should be patched together. Do to this, type the following depending
on the name of your .LST file and the number of files you have (I got four
files):
COPY
/B MULTI.000 + MULTI.001 +
MULTI.002 + MULTI.003 FINAL.ISO
This will patch all the files together to a new file called “FINAL.ISO”.
Note: You can also use a small
tool “CDVDGEN ISOBuilder” which I made myself to build the ISO from the parts
generated by CDVDGEN. It’s doing the same thing, but it’s a windows tool to
make it easier (browsing to files, sorting them in the right other, etc)
Please note: For CDVDGEN ISO
Builder to work, the VB runtime DLLs should be installed on your computer and
maybe some more windows components!
Also, please read the Help
file that is provided with the program!
Anyway, your ISO is finished, so open up DVD Decrypter to burn “FINAL.ISO”
(or any other decent burning program) on a DVD-R or even better on a DVD-RW (if
your PS2 can read them) to test it out. Pop it in your PS2 and hope for the best!
The games in this tutorial are tested and they work.
Alternative: If you are lucky
and have a burner that is compatible with CDVDGEN, then after clicking the
Record Button and saving your .IML file, you won’t get any error messages and
you do not have to export your image, but you can click the
![]()
button straight away and your image will be burned
immediately. Pop it in your PS2 and hope for the best!
= END TUTORIAL =
========================================================================
Addition – Put one CD game or
DVD rip on a DVD
========================================================================
Most of the time you are interested in putting more than one game on a
DVD, since this will save you some discs and money. But in some cases you just
want to put one CD or DVD rip on a DVD.
Please note again:
Not all
DVD rips and CD games on DVD will work. The success rate for putting DVD rips
back on
DVD is
pretty high. Putting CD games on DVD is a pain in the ass, and it depends on
the quality of
the DVD Scanlite tool by Sonix which should patch is
correctly for DVD.
Anyway, I will show how to put one CD game or DVD rip on a DVD. This will follow the previous tutorial
globally, so please read the previous tutorial carefully before asking questions.
Hints and tricks I said there and usage of the programs I won’t repeat here
again.
Anyway, the following stuff you will need for your project:
• An ISO’s or BIN/CUE
file for your DVD rip or CD game, or the original CD if you have it.
• ISOBuster.
• DVD Scanlite 3.5 by
Sonix.
• Sony CDVDGEN 1.5.
• DVD Decrypter for
burning an image.
• A Dummy file creator.
(I’ve used “Dummy creator by Infected Bajs”. Small and pretty fast)
Use ISObuster to open your ISO and save all the files to a separate
folder on your hard disc. If you have the original CD, you can just copy the
files using windows explorer (or something similar).
For this example I’ve used “Harry Potter and the Chamber of Secrets”
(PAL version), which is an original CD game, so I’ve used explorer.
With all the game files on hard disc, it’s time to patch the game, so
that it works on DVD.
Open up DVD Scanlite 3.5 and choose “DVD-R” option if you are using a CD
game and “Restore” if you are using a DVD rip (I’ve chosen “DVD-R” of course
since my game is a CD game)
and scan the SLES or SLUS file and other files that can be scanned.
In this case, I’ve patched file “SLES_512.18” and file “IOPRP243.IMG”
which was in folder “IOP”. (To know what
files are candidates to be scanned, please read the previous tutorial or the
guide that comes with DVD Scanlite 3.5 or just scan them all).
With your CD game or DVD rip patched, it’s time to make the DVD.
Open up ISO buster and look at the LBA values of your image (if you are
using an original CD, you can also make a BIN/CUE file with CDRWIN and open
that image with ISObuster and see the LBA values).
Open up CDVDGEN and again create a new project and make a new DVD-ROM
master disc, and drag all the files from windows explorer into the right pane of
CDVDGEN in ascending order of the LBA values you are seeing in ISOBuster. In
this case of course you must use the “SYSTEM” file of the game (not the one
from CDloader). Lastly you must add a dummy file of at least 600MB that you
should create with your dummy file creator and drag it in your compilation
also.
I got this compilation:
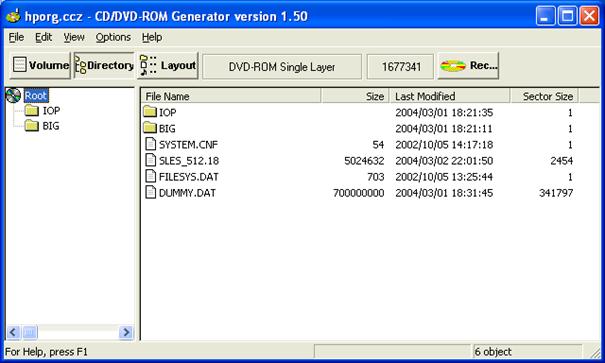
Now, click the “VOLUME” button to fill in the details.
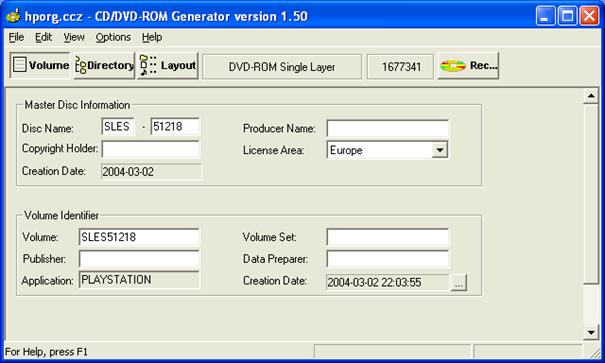
Again, the Disc Name must match your executable, so I’ve chosen “SLES”
and “51218”. The license Area should match the game, so if you have a PAL game,
use “
Press the
![]()
button and follow the previous tutorial from that point. If CDVDGEN
gives you an error that the image is too small (not enough sectors), you should
remove the dummy file and add one that’s a little bit bigger. Try adding a
dummy file that’s 50MB bigger. If not enough, another 50MB bigger etc. until
CDVDGEN accepts it.
Make the image, burn it and then pop it in your PS2 and hope for the
best!
= END ADDITION =
========================================================================
Known problems
========================================================================
• Not all games will work!!
• DVD Scanlite will not
patch all DVD rips and CD games correctly. Just try and see.
Especially games where an
intro or patch or PAL/NTSC selector was added might not patch correctly.
• Some games have all
kinds of LBA checks that prevent you from putting more games on one
disc, so that some
games won’t work. Not only the order in which files are on the disc, but
also on what LBA
“position”. Adding the games in a different order might help.
• There seems to be a
limit of 30 files (folders not included) that can be in your root. If you have
more
than 30 files, this compilation won’t work, so avoid this. People are working
on this to
maybe
crack the 30 files limit.
• Some games share the
same folders. Files from separate games can me merged into the same
folder,
but there is no guarantee it will work correctly. If the same file names are
shared, you
can
rename the file in something else that has the exact same file name length and then scan
each
file with an HEX editor and replace it with this new name. For example, if the
file
“SCREEN.IRX” is shared
in both games, say game “A” and “B”, then you can rename the file
of
game “B” to “SCRENN.IRX” (keep the same number of characters) and then scan
every
file
of game “B” for the string SCREEN.IRX and replace it with SCRENN.IRX everywhere
you
find it. The same can be done with folders. No guarantee that this will always
work
though.
Best way is to just avoid this, by
putting games on one disc that do not share
anything. People have
reported this as working (sometimes). I haven’t tested this personally,
so
give it a try!
========================================================================
Tests
========================================================================
The following games I have tested with success and are
working on a DVD:
• Auto_Modellista_USA_PS2-CSiSO
(DVD rip)
• Clock_Tower_3_USA_PS2-MIRACLE
(DVD rip)
• Paris.Dakar.Rally.2.DVDRIP.PAL.PS2-ConFuSiON
(DVD rip)
• Mortal_Kombat_Deadly_Alliance_USA_PS2-MiRACLE
(Only this DVD rip on a DVD)
• Harry Potter and the
Chamber of Secrets (Only this CD game on a DVD)
========================================================================
Credits
========================================================================
First of all, I didn’t come up with this; I just put the pieces together
from a lot of posts from forums and a lot of experimenting. A couple of months
ago I got multiple CD games on a CD working using CDLoader and I got also two
DVD games on a DVD. At that time I was using iml2iso to convert the .IML file
created by CDVDGEN to an ISO. This will only work when the ISO to be built
isn’t bigger than 2 gig. Also, DVD rips back on DVD wouldn’t work, since the
DVD checks had to be put back into the game.
Recently, I bumped into DVD Scanlite 3.5 by Sonix, and this was really
what I was looking for, since experimenting with other (experimental) scanners
was not successful. And this seemed to work pretty well! Also I found the way
to build and ISO with CDVDGEN using just simple “COPY /B” commands by browsing
through forums.
While the first version of this manual was almost finished I recently
found Gherudos’ tutorial for writing a multiple DVD
game (man, had I only found it sooner). He covers a lot of the stuff I’m
writing here, but I decided to finish this anyway because I ran into some
problems on my PC that weren’t in there (and also not in other guides I found)
and also I was interested in putting DVD rips and CD games back on DVD as well.
I’ve used only somebody else’s tools (well, except the one I wrote
myself), so real credits must go to:
• JayTeeMaster for writing
CDLoader (Excellent!)
• Sonix for writing DVD Scanlite 3.5 (Excellent! Newer versions on www.ps2ownz.com)
• Diesel604 for some useful info on a forum
• Allan_orozco for writing a multi
CD game manual which gave me a start.
• TheBigman for additional info on
DVD checks.
I hope this manual is useful for you. If not, just toss it!
If some games are not working, well… ehmm… too bad…
– See ya!
========================================================================
============ To contact me, send me an email on JRLSX@HOTMAIL.COM =============
========================================================================